Meridian Dress
I love PaperCut Patterns! This is their Meridian Dress pattern! I think I own all of their patterns except for just a few! I know, that’s crazy but they are amazing! I think I am so intrigued by the pattern assembly. It’s so interesting to see how the pieces come together because the shapes are so so strange! Go check out my Youtubevideo on this dress as well as well as on instagram!! I go into a little more detail for each category!

I will briefly discuss:
-Fabric choice
-Modifications
-Pattern layout
-Pattern construction
-Pattern fit
-Styling your garment
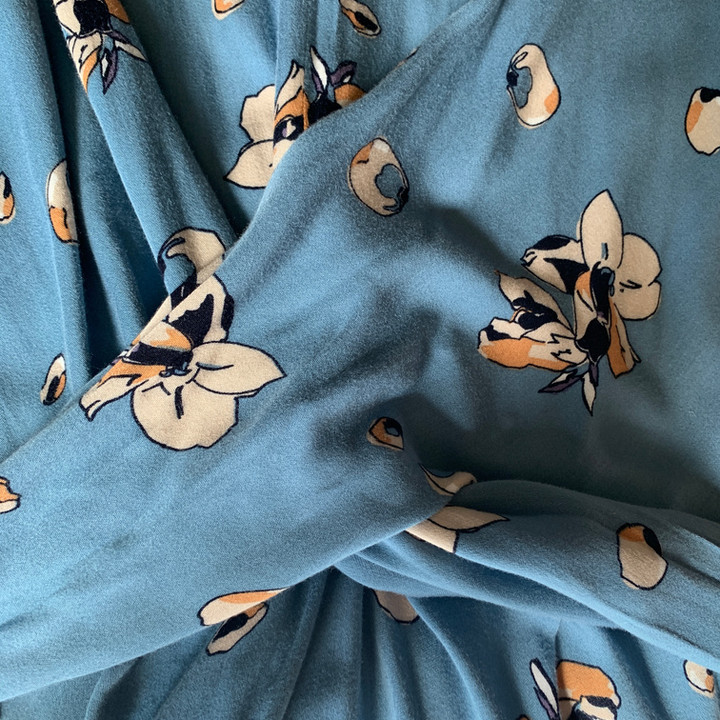
Fabric choice:
I chose this beautiful viscose from Lamazi fabrics! I do love shopping from Lamazi fabrics because the shipping is free to the US with an order over 85 pounds. I hate to say this, but with all the beautiful atelier brunette fabric they have on there, its not hard to reach that amount!!! They just have such a beautiful selection…anyways, I digress!

I think this dress lends itself to a beautiful viscose or rayon. I think a cotton lawn would also be nice. I love having a fabric that drapes for this dress. You don’t want something too stiff, because there is a lot of extra room and gathering made with the ties. You don’t want the fabric to struggle with being gathered. You want it to meld easily to being tied and gathered to highlight the wonderful parts of your God-given beautiful body!!!!
Modifications:

The only modification I made while gathering my materials for the dress was to grab a 50cm zipper. At the typical fabric store near you in the US you likely have 12-14 in (30-35 cm) zippers and 20-22 inch (50-55 cm) zippers. Since the pattern calls for a 40 cm zipper and I have made a zipper shorter with bad results before, I used the longer choice. I decided a longer zipper would not harm anything, but a shorter one could create a major problem! Therefore, I used the 20-22 inch invisible zipper.
Pattern layout:
This is relatively simple according to the instructions. I did run into a problem in construction with one of the front bodice pieces. The way you fold this piece together to make the long tie that extends from the front bodice is to fold them right sides together to make the notches match longways, and the pieces must have been cut out properly to do this. By properly, I mean on the grain. Pay close attention to the grainlines and if your fabric is folded, make sure the fabric underneath is still straight and lined up! One of my pieces fold and melded very well and the other one was twisting and not wanting to fold in half.
Construction:
The construction went very well for the most part. The instructions are easy to understand.
The pleats don’t have any arrows to show the direction in which you bring the notches together, but it is easy to see from the illustration how they should be folded.
I ran into a bit of a problem when it came to attaching the front bodice with the ties to the front skirt. I cut the notch into the seam allowance at the top of the seam line as instructed. I then assembled the pieces together and noticed it was very hard at the midline to keep the fabric from buckling, or adding extra folds under the needle, and to keep the ties out of the way. When I initially stitched the front bodice to the front skirt, I looked at the dress from the front by looking at the right side of my seam and noticed it was a bit messy at the center. It didn’t not catch everything and because of my slit there into the seam allowance, there was a hole! I kind of expected this but just wanted to see how it would look. I didn’t want this hole even though it would be covered by the ties, because it is a weak point and it is a place the material could run and have loose ends. I decided to stitch down to a point almost to make sure the hole was closed and then slowly come back up to the original stitch line made when sewing the front bodice to front skirt together.

This took a bit of trial and error and I had to pull out stitches a few times because extra material was getting caught into my seam! I finally managed to get it done! It left a little bit of a pinch in the front of the garment, but at least it is closed now and the seam was then overlocked. This pucker will be covered by the ties and will not affect the final garment!

When attaching the facing, the dress neckline had stretched quite a bit. You would think I would have learned by now that it needs to be stay stitched. I had to slightly gather the neckline evenly using a basting stitch, more in some spots than others, so that it would fit the interfaced facing.

I also ran into a problem when I topstitched the facing down from the right side. I found my garment was being twisted and warped as I went along to sew the facing down, even though I was using a walking foot. I started at the mid neckline and then went to the back center seam and down. Then, I did the other side. I decided, as long as I was consistently about 3cm from the edge of the garment, as instructed, that I could the topstitch from the wrong side. This would help slightly ease the delicate viscose onto the facing and help avoid pulling or stretching. I had to be very careful everything was positioned correctly.


Pattern fit:
The fit was fabulous and I didn’t have any problems! I loved the way that there is plenty of room for you to either tie it tight or leave it a little looser for those big meals!! Haha! Of note, funny thing is I attached a 22 inch zipper that I don’t need because I can slip it over my head just with the keyhole opening! Haha! I can imagine if I made it again I could just omit the zipper and make the keyhole a little larger!

Styling your garment:
Well I think this dress looks good with just about anything! Multiple different types of hats, purses, shoes! Just experiment and have fun! It can be dressed up or down depending on accessories! I think that it definitely changes the look depending on the type and pattern of fabric you use!

Dress Pattern: Papercut Patterns: Meridian Dress
Material: Lamazi Fabrics
Shoes: L'artiste
Youtube video: here